
作死了解一下spring cloud。当然,不知道能了解到什么程度。先作一死。
找到了一个博客,准备照着那个博客来搞搞博客地址。这个博客的好处是原理和介绍带一些,代码、pom、配置全都在博客中可以直接复制。第二点——可以直接复制黏贴实践,第一点——复制了能让你知道复制的是干了嘛。当然,原理和介绍稍微有点少,所以哈,最好还是提前了解一些微服务的一些概念。
先讲一下我的环境。jdk1.8.0_171+springboot 1.5.2.RELEASE+spring cloud Dalston.RC1 。事实证明,因为springcloud这个项目还在快速的变化之中,版本之间的变化很快,所以版本对应就很重要。
github源码地址:https://github.com/arloor/cloud/
模块0 模块1 服务注册与发现
在这里,我们需要用的的组件上Spring Cloud Netflix的Eureka ,eureka是一个服务注册和发现模块。
模块 0-eureka-server
该模块负责注册中心的职责
完整的pom.xml
<?xml version="1.0" encoding="UTF-8"?>
<project xmlns="http://maven.apache.org/POM/4.0.0"
         xmlns:xsi="http://www.w3.org/2001/XMLSchema-instance"
         xsi:schemaLocation="http://maven.apache.org/POM/4.0.0 http://maven.apache.org/xsd/maven-4.0.0.xsd">
    <modelVersion>4.0.0</modelVersion>

    <groupId>com.arloor</groupId>
    <artifactId>faxian</artifactId>
    <version>1.0-SNAPSHOT</version>

    <parent>
        <groupId>org.springframework.boot</groupId>
        <artifactId>spring-boot-starter-parent</artifactId>
        <version>1.5.2.RELEASE</version>
        <relativePath/> <!-- lookup parent from repository -->
    </parent>

    <properties>
        <project.build.sourceEncoding>UTF-8</project.build.sourceEncoding>
        <project.reporting.outputEncoding>UTF-8</project.reporting.outputEncoding>
        <java.version>1.8</java.version>
    </properties>

    <dependencies>
        <!--eureka server -->
        <dependency>
            <groupId>org.springframework.cloud</groupId>
            <artifactId>spring-cloud-starter-eureka-server</artifactId>
        </dependency>

        <!-- spring boot test-->
        <dependency>
            <groupId>org.springframework.boot</groupId>
            <artifactId>spring-boot-starter-test</artifactId>
            <scope>test</scope>
        </dependency>

        <dependency>
            <groupId>com.sun.jersey</groupId>
            <artifactId>jersey-bundle</artifactId>
            <version>1.19</version>
        </dependency>
    </dependencies>

    <dependencyManagement>
        <dependencies>
            <dependency>
                <groupId>org.springframework.cloud</groupId>
                <artifactId>spring-cloud-dependencies</artifactId>
                <version>Dalston.RC1</version>
                <type>pom</type>
                <scope>import</scope>
            </dependency>
        </dependencies>
    </dependencyManagement>

    <build>
        <plugins>
            <plugin>
                <groupId>org.springframework.boot</groupId>
                <artifactId>spring-boot-maven-plugin</artifactId>
            </plugin>
        </plugins>
    </build>

    <repositories>
        <repository>
            <id>spring-milestones</id>
            <name>Spring Milestones</name>
            <url>https://repo.spring.io/milestone</url>
            <snapshots>
                <enabled>false</enabled>
            </snapshots>
        </repository>
    </repositories>
</project>
注意:在原博客中dependency中没有
<dependency>
    <groupId>com.sun.jersey</groupId>
    <artifactId>jersey-bundle</artifactId>
    <version>1.19</version>
</dependency>
但是实际操作会报错,在网上找到的解决方案就是加上这个。
Main类
@EnableEurekaServer
@SpringBootApplication
public class EurekaserverApplication {

    public static void main(String[] args) {
        SpringApplication.run(EurekaserverApplication.class, args);
    }
}
application.properties
server.port=8761

eureka.instance.hostname=localhost
eureka.client.registerWithEureka=false
eureka.client.fetchRegistry=false
eureka.client.serviceUrl.defaultZone=http://${eureka.instance.hostname}:${server.port}/eureka/
eureka.client.registerWithEureka=false
eureka.client.fetchRegistry=false
表明自己是一个eureka server。有一个因为这两个配置没有生效导致的问题如下:
在原博客中使用的是application.yml。同样配置下,在实际操作中报错Cannot execute request on any known server。搜了一下,发现说:
原因:Eureka的Server没有启动,而在使用@EnableDiscoveryClient或者@EnableEurekaClient之后,该客户端会自动去寻找Eureka Server,如果找不到就会报这个错。
但我们这里做的是,eureka server呀。所以归根揭底还是application.yml没有生效,于是改用了application.properties。报这个错还有一种可能是application.properties没有被加入\target\classes文件夹下(就是idea的output path那个文件夹),刚刚就遇到了这个问题。
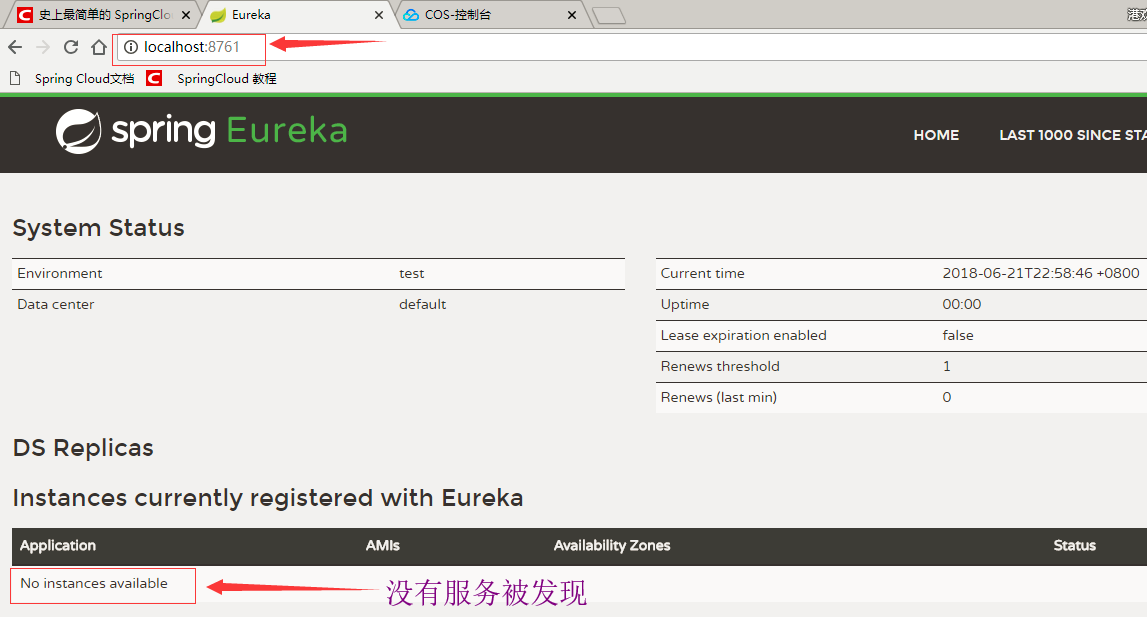
eureka server是有后台的。可以访问http://localhost:8761/查看,如图:
模块 1-service-hi 一个微服务,并测试服务注册
pom.xml
<?xml version="1.0" encoding="UTF-8"?>
<project xmlns="http://maven.apache.org/POM/4.0.0"
         xmlns:xsi="http://www.w3.org/2001/XMLSchema-instance"
         xsi:schemaLocation="http://maven.apache.org/POM/4.0.0 http://maven.apache.org/xsd/maven-4.0.0.xsd">
    <modelVersion>4.0.0</modelVersion>

    <groupId>com.arloor</groupId>
    <artifactId>service-hi</artifactId>
    <version>1.0-SNAPSHOT</version>


    <parent>
        <groupId>org.springframework.boot</groupId>
        <artifactId>spring-boot-starter-parent</artifactId>
        <version>1.5.2.RELEASE</version>
        <relativePath/> <!-- lookup parent from repository -->
    </parent>

    <properties>
        <project.build.sourceEncoding>UTF-8</project.build.sourceEncoding>
        <project.reporting.outputEncoding>UTF-8</project.reporting.outputEncoding>
        <java.version>1.8</java.version>
    </properties>

    <dependencies>
        <dependency>
            <groupId>org.springframework.cloud</groupId>
            <artifactId>spring-cloud-starter-eureka</artifactId>
        </dependency>
        <dependency>
            <groupId>org.springframework.boot</groupId>
            <artifactId>spring-boot-starter-web</artifactId>
        </dependency>

        <dependency>
            <groupId>org.springframework.boot</groupId>
            <artifactId>spring-boot-starter-test</artifactId>
            <scope>test</scope>
        </dependency>
    </dependencies>

    <dependencyManagement>
        <dependencies>
            <dependency>
                <groupId>org.springframework.cloud</groupId>
                <artifactId>spring-cloud-dependencies</artifactId>
                <version>Dalston.RC1</version>
                <type>pom</type>
                <scope>import</scope>
            </dependency>
        </dependencies>
    </dependencyManagement>

    <build>
        <plugins>
            <plugin>
                <groupId>org.springframework.boot</groupId>
                <artifactId>spring-boot-maven-plugin</artifactId>
            </plugin>
        </plugins>
    </build>

    <repositories>
        <repository>
            <id>spring-milestones</id>
            <name>Spring Milestones</name>
            <url>https://repo.spring.io/milestone</url>
            <snapshots>
                <enabled>false</enabled>
            </snapshots>
        </repository>
    </repositories>
</project>
application.yml
eureka:
  client:
    serviceUrl:
      defaultZone: http://localhost:8761/eureka/
server:
  port: 8762
spring:
  application:
    name: service-hi
Main类
@SpringBootApplication
@EnableEurekaClient
@RestController
public class ServiceHiApplication {

    public static void main(String[] args) {
        SpringApplication.run(ServiceHiApplication.class, args);
    }

    @Value("${server.port}")
    String port;
    @RequestMapping("/hi")
    public String home(@RequestParam String name) {
        return "hi "+name+",i am from port:" +port;
    }

}
事实证明,application.yml也是可以的,真正不生效的原因是idea没有将它放入\target\classes。
eureka.client.serviceUrl.defaultZone=http://localhost:8761/eureka/   ##指明了注册中心的位置。

spring.application.name=service-hi  ##指明了服务名。这个服务名就是以后与其他服务交互的标识。
再看Main类,其实就是一个@RestController加上@EnableEurekaClient。
看一下service-hi启动时的log:
2018-06-21 23:55:42.063  INFO 1040 --- [           main] com.netflix.discovery.DiscoveryClient    : Getting all instance registry info from the eureka server
2018-06-21 23:55:42.452  INFO 1040 --- [           main] com.netflix.discovery.DiscoveryClient    : The response status is 200
2018-06-21 23:55:42.454  INFO 1040 --- [           main] com.netflix.discovery.DiscoveryClient    : Starting heartbeat executor: renew interval is: 30
2018-06-21 23:55:42.458  INFO 1040 --- [           main] c.n.discovery.InstanceInfoReplicator     : InstanceInfoReplicator onDemand update allowed rate per min is 4
2018-06-21 23:55:42.461  INFO 1040 --- [           main] com.netflix.discovery.DiscoveryClient    : Discovery Client initialized at timestamp 1529596542461 with initial instances count: 1
2018-06-21 23:55:42.487  INFO 1040 --- [           main] o.s.c.n.e.s.EurekaServiceRegistry        : Registering application service-hi with eureka with status UP
2018-06-21 23:55:42.488  INFO 1040 --- [           main] com.netflix.discovery.DiscoveryClient    : Saw local status change event StatusChangeEvent [timestamp=1529596542488, current=UP, previous=STARTING]
2018-06-21 23:55:42.490  INFO 1040 --- [nfoReplicator-0] com.netflix.discovery.DiscoveryClient    : DiscoveryClient_SERVICE-HI/laptop:service-hi:8762: registering service...
2018-06-21 23:55:42.537  INFO 1040 --- [nfoReplicator-0] com.netflix.discovery.DiscoveryClient    : DiscoveryClient_SERVICE-HI/laptop:service-hi:8762 - registration status: 204
2018-06-21 23:55:42.563  INFO 1040 --- [           main] s.b.c.e.t.TomcatEmbeddedServletContainer : Tomcat started on port(s): 8762 (http)
2018-06-21 23:55:42.564  INFO 1040 --- [           main] .s.c.n.e.s.EurekaAutoServiceRegistration : Updating port to 8762
2018-06-21 23:55:42.569  INFO 1040 --- [           main] c.arloor.servicehi.ServiceHiApplication  : Started ServiceHiApplication in 7.299 seconds (JVM running for 9.267)
能看到注册、status up、心跳间隔30等信息。
现在再看一下http://localhost:8761/就会发现有名为service-hi的服务。
至此第一学习博客的第一篇看完了。可以看到spring cloud基本上就是在spring boot写restful api的基础上加了一些注解和一些配置。唯一不太好的问题就是,依赖关系好像还不太稳定,比如上面需要添加jersey-bundle的依赖。
高可用的服务注册中心——多个服务中心相互备份
只有一个服务注册中心的话,当服务过多的情况下,注册中心的压力是很大的。
现在来搞多个服务注册中心。
代码和依赖无需改变,只需要使用不同的配置文件,启动三个erueka server并且这三个erueka-server互相注册,那么就会互相识别为备份,向一个server注册,则所有server都会怎讲所注册的服务。
首先修改hosts,增加:
127.0.0.1 peer1
127.0.0.1 peer2
127.0.0.1 peer0
然后,定义application-peer0.yml
server:
  port: 8760

spring:
  profiles: peer0
eureka:
  instance:
    hostname: peer0
  client:
    serviceUrl:
      defaultZone: http://peer1:8761/eureka/
然后,定义application-peer1.yml
server:
  port: 8761

spring:
  profiles: peer1
eureka:
  instance:
    hostname: peer1
  client:
    serviceUrl:
      defaultZone: http://peer2:8762/eureka/
然后,定义application-peer2.yml
server:
  port: 8762

spring:
  profiles: peer2
eureka:
  instance:
    hostname: peer2
  client:
    serviceUrl:
        defaultZone: http://peer0:8760/eureka/
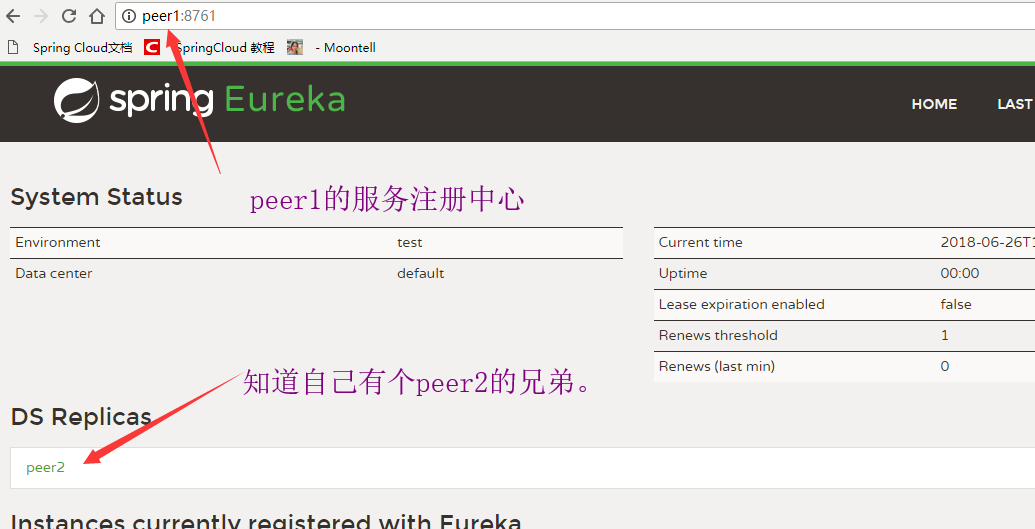
这样的含义就是,peer0的注册中心会向peer1注册自己;peer1的注册中心会向peer2注册自己;peer2的注册中心会向peer0的注册中心注册自己。这样就是一个环形的结构。但是其实这不是peer to peer,而其实是链式,如果一个点断了就不行了。感觉这还是一个不足。
另外一个不足是,当需要服务注册中心的服务时(注册自己或者发现其他服务)还是需要通过url指定特定的一个服务注册中心。也就是服务注册中心没有进行负载均衡。。
这两个点,想着就很不舒服啊。
如何把这三个peer跑起来:
在idea的启动配置中增加EurekaserverApplicationPeerX,并且在Environment->Program arguments中输入--spring.profiles.active=peerX
这样把三个都加一下,然后就能启动了。
这是eureka的网页控制台如下:
模块 2-service-ribbon 服务消费者 ribbon+restTemplate
从现在开始,博客中不再写完整的pom.xml
我们现在有了一个服务注册中心eureka server@8761,还有service-hi模块,提供一个restful的服务。下面就来实践怎么把service-hi以服务的方式消费掉。
ribbon是一个客户端的负载均衡器,可以有效地对tcp/http进行控制。
先上代码吧:
//主类
@SpringBootApplication
@EnableDiscoveryClient
public class ServiceRibbonApplication {

    public static void main(String[] args) {
        SpringApplication.run(ServiceRibbonApplication.class, args);
    }

    @Bean
    @LoadBalanced
    RestTemplate restTemplate() {
        return new RestTemplate();
    }

}

//调用service-hi服务的bean
@Service
public class HelloService {

    @Autowired
    RestTemplate restTemplate;

    public String hiService(String name) {
        return restTemplate.getForObject("http://SERVICE-HI/hi?name="+name,String.class);
    }
}

//restController
@RestController
public class HelloControler {

    @Autowired
    HelloService helloService;
    @RequestMapping(value = "/hi")
    public String hi(@RequestParam String name){
        return helloService.hiService(name);
    }
}
可以看到在主类中定义了一个restTemplate的bean,并且加了@LoadBalanced注解,顾名思义就是这个bean会做负载均衡了。
再看helloService中,通过http://SERVICE-HI/hi?name=的方式,用SERVICE-HI代替了服务具体的URL。
另外,再看主类,有注解@EnableDiscoveryClient表示这是一个服务发现的客户端。application.yml中配置如下:
eureka:
  client:
    serviceUrl:
      defaultZone: http://localhost:8761/eureka/
server:
  port: 8764
spring:
  application:
    name: service-ribbon
基本和service-hi的配置一样,端口、eureka-server地址、服务名。
看代码大概就能知道,service-ribbon是用户会在浏览器通过url访问的地址(客户端),然后service-ribbon通过负载均衡,去调用某一个service-hi。
跑一下试试
1.先在8761跑0-eureka-server
2.在8762跑一个1-service-hi
3.在8763跑一个1-service-hi。idea如何跑多个实例这样就注册了两个service-hi的实例。
4.在8764跑service-ribbon
5.在浏览器输入http://localhost:8764/hi?name=moontell
多次输入5,可以看到hi moontell,i am from port:8763,hi moontell,i am from port:8762轮流出现,说明实现了负载均衡。此时的架构部署如下:
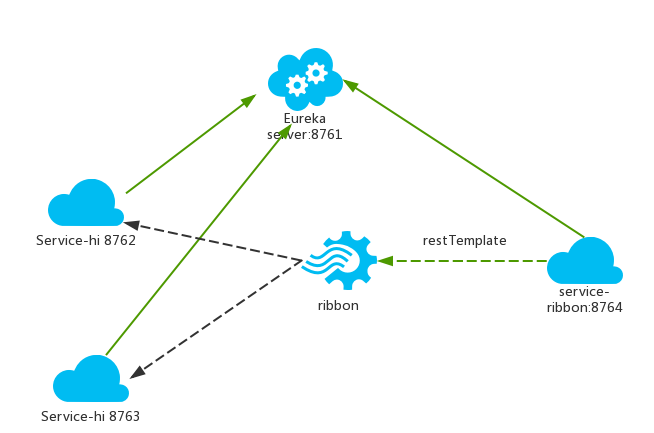
这个图看着就很舒服了,我也算是接触了分布式了哈哈哈。
关于ribbon这个负载均衡的实现,再稍微看一点其他东西。现在能做的也只是多看一点点。就跟这个博客一样,只为了入个门,以后再看文档去。不实践一下,spring cloud这么多组件都不知道是干嘛的,文档都看不懂。。。(另外,spring cloud的文档感觉更新的不怎么好,现在fin..版本都出来了,但是文档好像还没跟上。
先放参考地址:ribbon ILoadBalancer接口及其实现
学习的博客中提到,ribbon提供了默认配置的一些bean,各个bean的职责虽然不清楚,但是几个词还是明白干什么的。ServerList、Ping、ZonePreferenceServerListFilter。就猜一猜,跟据ping的值,对server List进行挑选,挑选的规则就是ZonePreference。大概就是这个意思吧。再看参考博客确实也是这样。当然这些bean感觉都是可以配置的,可以根据自己的需要去改变,以后看文档搞。
想想当初的体系结构课上,自己想用filter架构模式,对服务实例通过ping值,找到最佳的服务节点,以达到客户端负载均衡的目的。那个时候啥分布式负载均衡的实现都不知道,但还能用客户端负载均衡这个精准的名词。当时的那个想法跟这一套是一样的呀。
另外,以前还没有用过restTemplate这个bean,可以试试用用。
模块3-service-feign
Feign是一个声明式的伪Http客户端,它使得写Http客户端变得更简单。使用Feign,只需要创建一个接口并注解。它具有可插拔的注解特性,可使用Feign 注解和JAX-RS注解。Feign支持可插拔的编码器和解码器。Feign默认集成了Ribbon,并和Eureka结合,默认实现了负载均衡的效果。
简而言之:
- Feign 采用的是基于接口的注解
- Feign 整合了ribbon
这个模块其实就是用feign代替了上面的ribbon。其实Feign可以理解微ribbon的一个高级封装。在代码中就可以看到,Feign的使用是Interface类加注解。
Main类:@EnableFeignClients开启Feign
@SpringBootApplication
@EnableDiscoveryClient
@EnableFeignClients
public class ServiceFeignApplication {

    public static void main(String[] args) {
        SpringApplication.run(ServiceFeignApplication.class, args);
    }
}
feign接口:指明了使用service-hi服务。注意还加了@RequestMapping注解
@FeignClient(value = "service-hi")
public interface SchedualServiceHi {
    @RequestMapping(value = "/hi",method = RequestMethod.GET)
    String sayHiFromClientOne(@RequestParam(value = "name") String name);
}
RestController:消费服务
@RestController
public class HiController {

    @Autowired
    SchedualServiceHi schedualServiceHi;
    @RequestMapping(value = "/hi",method = RequestMethod.GET)
    public String sayHi(@RequestParam String name){
        return schedualServiceHi.sayHiFromClientOne(name);
    }
}
application.yml:一样的注册中心地址、端口、服务名
eureka:
  client:
    serviceUrl:
      defaultZone: http://localhost:8761/eureka/
server:
  port: 8765
spring:
  application:
    name: service-feign
跑一下:
1.先在8761跑0-eureka-server
2.在8762跑一个1-service-hi
3.在8763跑一个1-service-hi。idea如何跑多个实例这样就注册了两个service-hi的实例。
4.在8765跑service-feign
5.在浏览器输入http://localhost:8765/hi?name=moontell
重复5,效果和跑service-ribbon是一样的。可以看到hi moontell,i am from port:8763,hi moontell,i am from port:8762轮流出现,说明实现了负载均衡。
Spring cloud有两种服务调用方式,一种是ribbon+restTemplate,另一种是feign。至此都实践了。
在feign和ribbon中加入断路器
想想看上面已经有了服务注册中心,也会开发服务了,两种消费服务的方式也有了。但是这不是微服务的全部。这里就搞一下断路器。
在微服务架构中,根据业务来拆分成一个个的服务,服务与服务之间可以相互调用(RPC),在Spring Cloud可以用RestTemplate+Ribbon和Feign来调用。为了保证其高可用,单个服务通常会集群部署。由于网络原因或者自身的原因,服务并不能保证100%可用,如果单个服务出现问题,调用这个服务就会出现线程阻塞,此时若有大量的请求涌入,Servlet容器的线程资源会被消耗完毕,导致服务瘫痪。服务与服务之间的依赖性,故障会传播,会对整个微服务系统造成灾难性的严重后果,这就是服务故障的“雪崩”效应。
Netflix开源了Hystrix组件,实现了断路器模式,SpringCloud对这一组件进行了整合。较底层的服务如果出现故障,会导致连锁故障。当对特定的服务的调用的不可用达到一个阀值(Hystric 是5秒20次) 断路器将会被打开。
2-service-ribbon开启Hystrix:
pom.xml增加依赖:
<dependency>
    <groupId>org.springframework.cloud</groupId>
    <artifactId>spring-cloud-starter-hystrix</artifactId>
</dependency>
在主类中增加@EnableHystrix
@SpringBootApplication
@EnableDiscoveryClient
@EnableHystrix//允许断路器
public class ServiceRibbonApplication {

    public static void main(String[] args) {
        SpringApplication.run(ServiceRibbonApplication.class, args);
    }

    @Bean
    @LoadBalanced
    RestTemplate restTemplate() {
        return new RestTemplate();
    }

}
在service中增加 @HystrixCommand(fallbackMethod = “hiError”)//定义断路器的fallback方法,并定义hiError方法
@Service
public class HelloService {

    @Autowired
    RestTemplate restTemplate;

    @HystrixCommand(fallbackMethod = "hiError")//定义断路器的fallback方法
    public String hiService(String name) {
        return restTemplate.getForObject("http://SERVICE-HI/hi?name="+name,String.class);
    }

    public String hiError(String name) {
        return "hi,"+name+",sorry,error!";
    }

}
这样,当service-hi不可用时(测试时关闭service-hi就不可用了),ribbon会直接调用hiError方法,返回hi ,forezp,orry,error!。
这就说明当 service-hi 工程不可用的时候,service-ribbon调用 service-hi的API接口时,会执行快速失败,直接返回一组字符串,而不是等待响应超时,这很好的控制了容器的线程阻塞。
3-service-feign开启Hystrix:
Feign是自带断路器的,在D版本的Spring Cloud中,它没有默认打开。需要在配置文件中配置打开它,在配置文件加以下代码:
feign.hystrix.enabled=true
在@FeignClient中增加fallback字段,定义fallback时接口的实现类。
@FeignClient(value = "service-hi",fallback = SchedualServiceHiHystric.class)
public interface SchedualServiceHi {
    @RequestMapping(value = "/hi",method = RequestMethod.GET)
    String sayHiFromClientOne(@RequestParam(value = "name") String name);
}
SchedualServiceHiHystric.class实现:(需要@Coponent注解纳入spring容器管理,并实现SchedualServiceHi接口)
//service-hi断路时调用的方法。需要@Component加入容器,需要implements Feign的接口
@Component
public class SchedualServiceHiHystric implements SchedualServiceHi {
    @Override
    public String sayHiFromClientOne(String name) {
        return "sorry "+name;
    }
}
同样的,如果关闭service-hi,访问http://laptop:8765/hi?name=a就会返回sorry ...。