
wsl 全称是 windows 的 linux 子系统,可以理解为在你的 windows 电脑上提供一个 linux 的工作环境。
windows 虚拟化的基础知识
| windows 功能 | 作用 | 其他 |
|---|---|---|
| Hyper-V | 微软自己的虚拟化工具 | 包含了“管理工具”和“平台”,其中“平台”包含“服务”和“虚拟机监控程序” |
| Windows Subsystem for Linux | WSL1,不是我们讨论的 WSL2 所需要的 | |
| Virtual Machine Platform | 虚拟机平台(WSL2 的底层依赖) | 看到说 Hyper-V 也依赖这个,但启用 Hyper-V 并不需要启用虚拟机平台,因此我觉得 Hyper-V 依赖的是“Hyper-V 虚拟机监控程序”吧 |
| Windows Sandbox | 一个隔离的桌面环境 | 我反正没用过,不了解 |
| Windows 虚拟机监控程序平台 | 用于支持 vmware 等第三方虚拟机软件 |
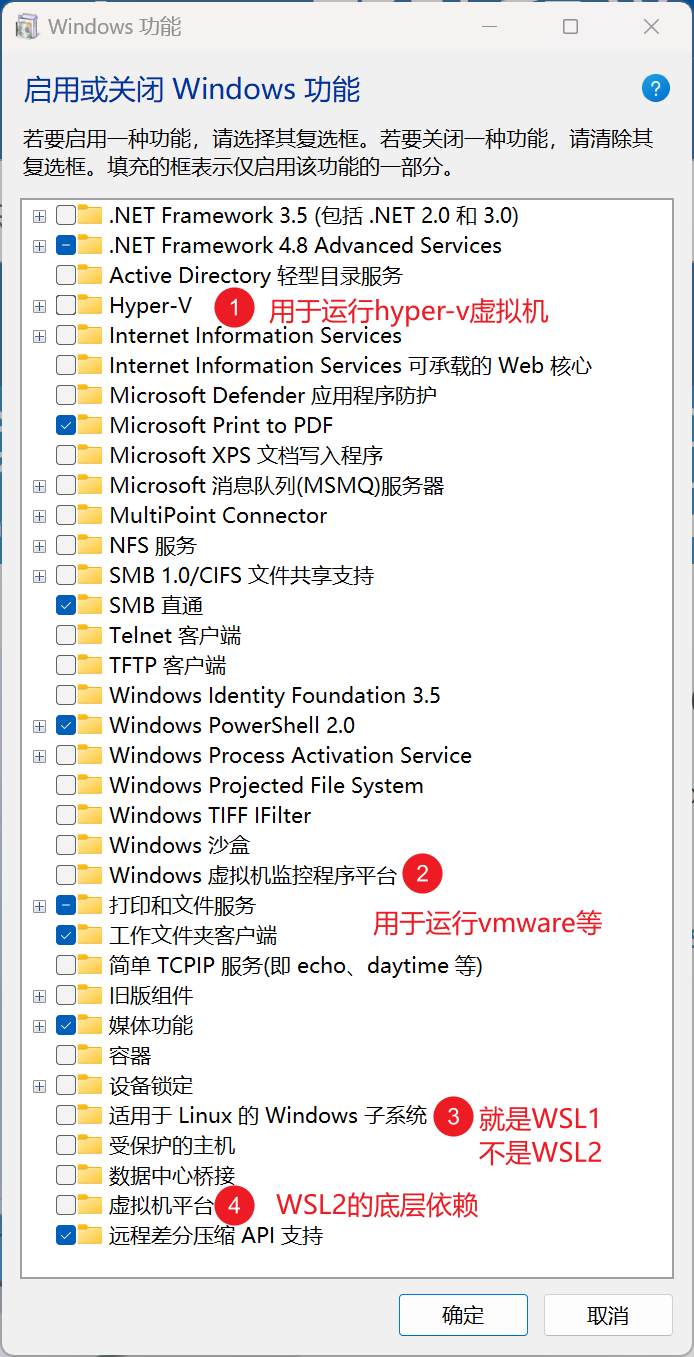
- 虚拟机平台会一定程度上影响游戏性能,为了游戏性能,可以关闭虚拟机平台、Hyper-V。Windows 虚拟机监控程序平台、适用于 Linux 的 Windows 子系统我理解是不影响游戏性能的。参考用于在 Windows 11 中优化游戏性能的选项。
- Hyper-V 和 vmware 等软件是冲突的,详见虚拟化应用程序无法与 Hyper-V、Device Guard 和 Credential Guard 协同工作
关闭虚拟机平台和 Hyper-V 虚拟机监控程序:
dism.exe /online /disable-feature /featurename:VirtualMachinePlatform /norestart
# 其实只要关闭 Microsoft-Hyper-V-Hypervisor 就行了
DISM /Online /Disable-Feature /FeatureName:Microsoft-Hyper-V-All /NoRestart
sc.exe config wslservice start= disabled
开启虚拟机平台和 Hyper-V 虚拟机监控程序:
dism.exe /online /enable-feature /featurename:VirtualMachinePlatform /all /norestart
DISM /Online /Enable-Feature /All /FeatureName:Microsoft-Hyper-V-All /NoRestart
sc.exe config wslservice start= demand
查看所有 windows 功能
dism.exe /online /Get-Features
%userprofile%/.wslconfig
[wsl2]
# networkingMode=bridged
# vmSwitch=Home # 此处的名称和指定的虚拟网络交换机一致
# dhcp=false # 禁用DHCP,在WSL2系统中通过设置Linux的静态IP实现获取IP
networkingMode = mirrored # 端口自动转发,Windows和WSL共享端口,都使用127.0.0.1
dnsTunneling = true # WSL的DNS请求通过Windows转发
firewall = true # WSL同步Windows防火墙规则
autoProxy = true # Windows设置代理时自动同步给WSL,用于使用代理访问外网

[experimental]
sparseVhd = true # 自动清理磁盘空间
autoMemoryReclaim = gradual # 可以在gradual 、dropcache 、disabled之间选择。 如果设置成gradual,需要设置kernelCommandLine以开启cgroupV2,否则docker会有问题
hostAddressLoopback = true # WSL2中访问Windows的localhost

[wsl2]
swap = 0 # 禁用swap,使用内存交换文件,不使用磁盘交换文件
# 开启cgroup v2,用于docker和autoMemoryReclaim = gradual共存
kernelCommandLine = cgroup_no_v1=all systemd.unified_cgroup_hierarchy=1
上面的配置启用了自动内存回收,不过仍然可以手动释放 page cache(在 wsl 中执行):
echo "sync; echo 3 > /proc/sys/vm/drop_caches; touch /root/drop_caches_last_run" |tee /tmp/drop_caches
install /tmp/drop_caches /usr/local/bin/loss
loss
安装 WSL2
这里使用了 Debian12,因为我不喜欢 Ubuntu 的 Snap,而且 Debian12 的 wsl 发行版支持 ebpf。
# 启用VMP 虚拟机平台
dism.exe /online /enable-feature /featurename:VirtualMachinePlatform /all /norestart
echo you may need reboot to take effect
# 启用wslservice
sc.exe config wslservice start= demand
wsl --set-default-version 2
wsl -v
wsl --list --online
wsl --install -d Debian
# 设置默认root用户
debian config --default-user root
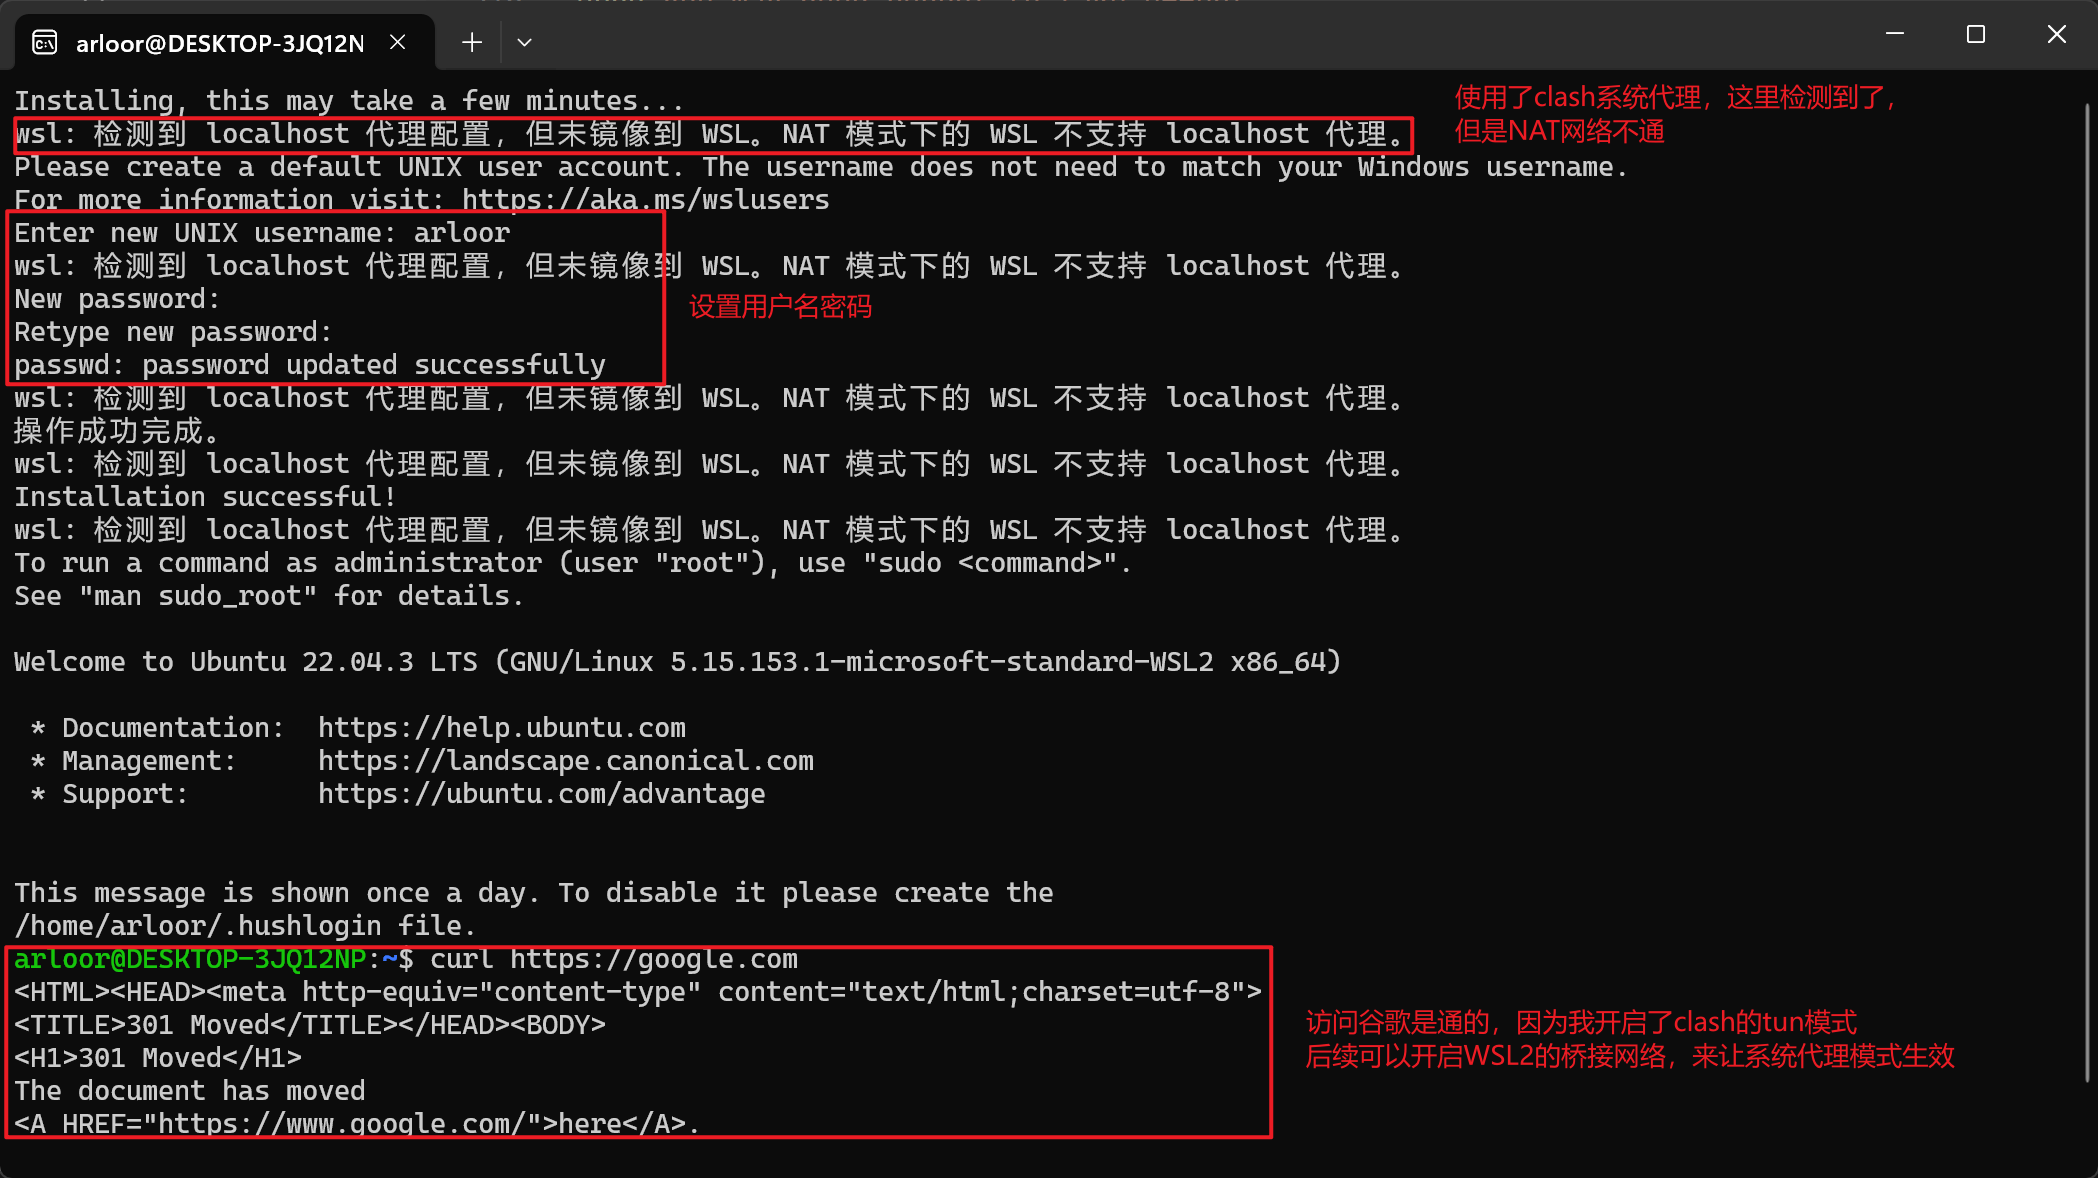
第一次启动
设置用户名和密码:
启用 systemd:
if ! grep -q "systemd=true" /etc/wsl.conf; then
    cat <<EOF | tee /etc/wsl.conf
[boot]
systemd = true

[user]
default = root

EOF
fi
执行 wsl --shutdown 重启 wsl,然后就可以使用 systemd 了。
其他设置
apt 设置代理
默认安装的 Debian 的默认源是官方源,国内比较慢,直接配置 apt 代理。
if ! grep -q Acquire::http::Proxy /etc/apt/apt.conf.d/proxy.conf;then
    cat <<EOF | tee /etc/apt/apt.conf.d/proxy.conf
Acquire::http::Proxy "https://user:passwd@server:port/";
Acquire::https::Proxy "https://user:passwd@server:port/";
# 否则报错没有ca-certificates
Acquire::https::Verify-Peer "false";
EOF
fi
apt 不更新某软件
apt-mark 可以对软件包进行设置(手动/自动)安装标记,也可以用来处理软件包的 dpkg(1) 选中状态,以及列出或过滤拥有某个标记的软件包。
apt-mark auto – 标记指定软件包为自动安装
apt-mark manual – 标记指定软件包为手动安装
apt-mark minimize-manual – Mark all dependencies of meta packages as automatically installed.
apt-mark hold – 标记指定软件包为保留(held back),阻止软件自动更新
apt-mark unhold – 取消指定软件包的保留(held back)标记,解除阻止自动更新
apt-mark showauto – 列出所有自动安装的软件包
apt-mark showmanual – 列出所有手动安装的软件包
apt-mark showhold – 列出设为保留的软件包

# 比如保留某个软件不更新可以使用hold标记,如docker
apt-mark hold docker*

apt-mark showhold

# 如果要解除保留可以使用unhold
apt-mark unhold docker*
git 设置
由于 wsl 支持 windows 和 linux 的命令互操作,你实际上会有两个 git,一个 wsl 的 git,一个 windows 的 git.exe。
WSL git 配置
git config --global core.editor vim
git config --global http.proxy http://127.0.0.1:7890
git config --global https.proxy http://127.0.0.1:7890
git config --global "includeIf.hasconfig:remote.*.url:*://*github.com*/**.path" .gitconfig_github
git config --global "includeIf.hasconfig:remote.*.url:git@github.com:*/**.path" .gitconfig_github
cat > ~/.gitconfig_github <<EOF
[user]
        name = arloor
        email = admin@arloor.com
EOF
git config --global credential.helper store
git config --global pull.rebase true
# wsl的git忽略文件权限的变更
git config --global core.filemode false
# wsl的git 提交时自动将crlf转换为lf,checkout时不转成crlf
git config --global core.autocrlf input
windows git 配置
wsl 的 git 提交时自动将 crlf 转换为 lf,checkout 时不转成 crlf
git config --global core.autocrlf input
git config --global pull.rebase true
# 保存 windows 的 git 凭证,避免每次都输入用户名和密码
git config --global credential.helper manager-core
autocrlf 的配置详见git 文档
简单解释就是:
- windows 使用 crlf 换行,linux 和 macos 使用 lf 换行(早期 macos 使用 cr 换行)
- autocrlf=true,提交到 index 时自动将 crlf 换成 lf,checkout 时自动将 lf 换成 crlf。适合 windows 使用,widnwos 默认配置
- autocrlf=input,提交到 index 时自动将 crlf 换成 lf,checkout 时不自动转换。适合 macos 和 linux 用。
- autocrlf=false,不自动转换换行符。
git 文档推荐,linux 和 macos 使用 input,windows 使用 true。这样保证 index、linux、macos 中永远是 lf,windows 中是 crlf。
但是我的设置成了 windows 上也是 input。
直接原因是我有很多 shell 脚本,原本 git.exe 的 bash 是可以执行 crlf 的 shell 文件的。安装 wsl 后,bash 被替换为了 Debian 的 bash,不能处理 crlf 的 shell 文件。——我需要 shell 脚本是 lf 的。根本原因,换行符的问题是一个历史遗留问题,是操作系统之间的壁垒。现代的 ide 或者文本编辑器都是跨平台使用的,他们能处理换行符的问题,那么用 vscode,idea 就行了,不要用 windows 的老版文本编辑器了。我已经比较习惯在 linux 处理文本了,vim、grep、awk、sed 等等很爽,wsl 的最大好处就是在 windows 上能用上原生的 bash,那就文本全部 linux 化好了。
安装 ca 证书
cp your-certificate.crt /usr/local/share/ca-certificates/
update-ca-certificates
docker 和 podman
- 如果你遇到 docker 无法从 Windows 访问的问题。首先确保 docker 版本在 27.3.0 以上,这个版本修复了这个问题,见[27.x backport] Do not DNAT packets from WSL2’s loopback0。如果不能升级 docker 的话,可以在 /etc/docker/daemon.json 里添加一句 “iptables”: false,然后重启 docker daemon
{
  "iptables": false
}
- podman 容器需要设置
--network host,否则其他容器访问会报错 no route to host。
参考文档
内存释放太慢,最不满意的一点
即使有了autoMemoryReclaim,任务管理器里看到的 VmmemWSL 还是远大于 wsl 里 top 看到的 res + buffer/cache。即使wsl -t Debian 也不会释放内存,只有wsl --shutdown才可以释放内存。观察到断开所有 wsl 的 terminal 和所有由用户启动的后台进程(不包含 systemd 启动的)都结束后,wsl 会在一段时间后自动 shutdown,此时 VmmemWSL 也会降为 0。但如果有后台进程常驻的话,就不会自动关闭了,这就建议放个 bat 文件在桌面,不用 wsl 的时候就 shutdown 掉吧。
@echo off
wsl --shutdown
相关 issue: WSL 2 consumes massive amounts of RAM and doesn’t return it
关于内存回收的问题,找到两个文章:
| 文章 | 时间 | 说明 |
|---|---|---|
| Memory Reclaim in the Windows Subsystem for Linux 2 | October 30th, 2019 | 基于某 kernel patch 的 pageReporting,将虚拟机闲置的连续的内存返还给宿主机。WSL 会在 cpu Idle 的时候进行内存的 compaction,然后进行返还。也可以手动执行echo 1 > /proc/sys/vm/compact_memory触发 |
| Automatic memory reclaim | September 18th, 2023 | “逐渐释放”:基于 CgroupV2 的 memory.reclaim 特性逐渐释放 page cache,与 docker 使用的 CgroupV1 冲突。“idle 时立即释放”:不依赖 CgroupV2 的特性,可与 docker 共存 |
让 wsl 一直在后台运行
https://www.cnblogs.com/wswind/p/17201979.html
简单方案: 写个 VBS 脚本,启动 wsl 的 terminal 在后台一直等待输入:
set ws=wscript.CreateObject("wscript.shell")
ws.run "wsl -d Debian", 0
进阶方案: 只启动一个后台进程,即使多次运行该 VBS 脚本:
keepalive 命令:
cat > /usr/local/bin/keepalive <<'EOF'
command="watch -n 30 'uptime |head -n 3 | tee /tmp/uptime'"
ps -ef|grep "${command}"|grep -v grep
if [ $? -ne 0 ]
then
    sh -c "${command}"
else
    echo "The command is already running"
fi
EOF
chmod +x /usr/local/bin/keepalive
写个 VBS 脚本:
set ws=wscript.CreateObject("wscript.shell")
ws.run "wsl -d Debian /usr/local/bin/keepalive", 0
将这个 VBS 脚本的快捷方式放到启动文件夹,这样就可以在开机时自动运行了。启动文件夹在:
%userprofile%\AppData\Roaming\Microsoft\Windows\Start Menu\Programs\Startup
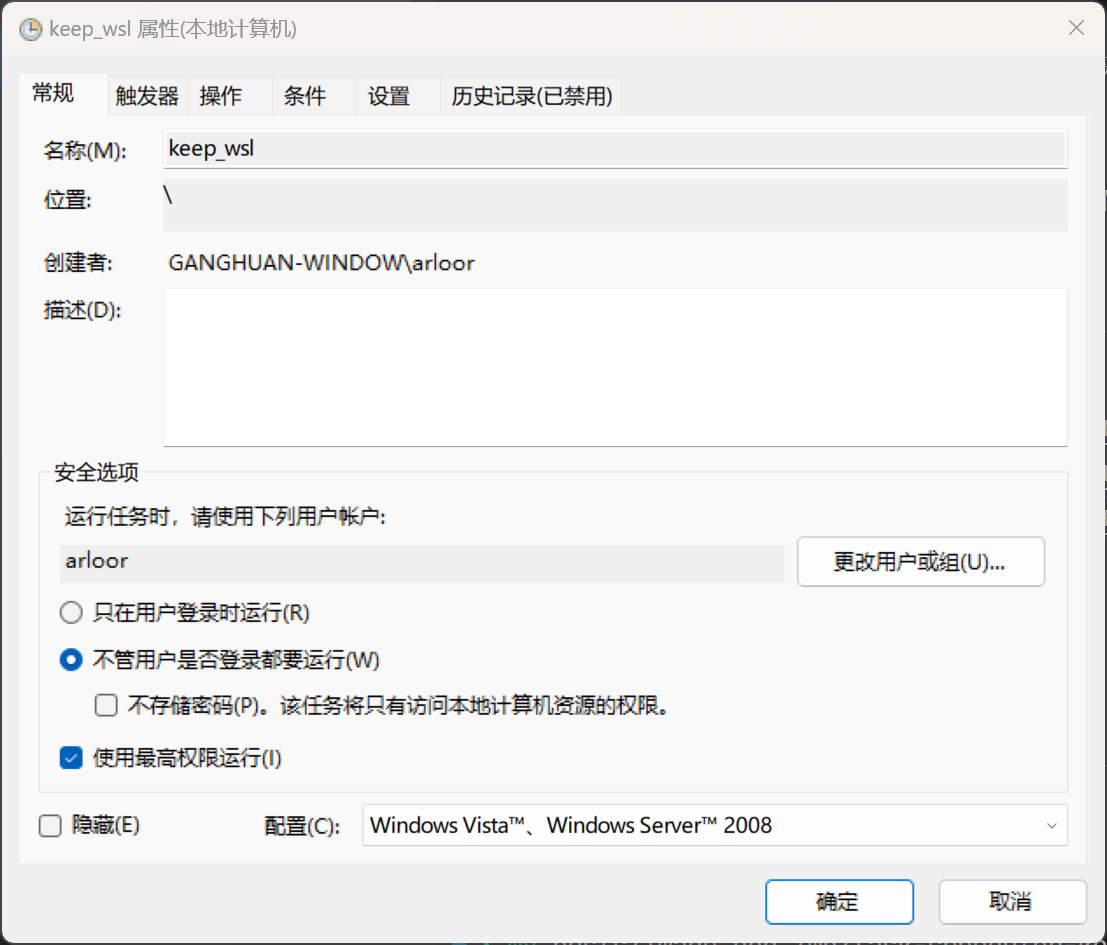
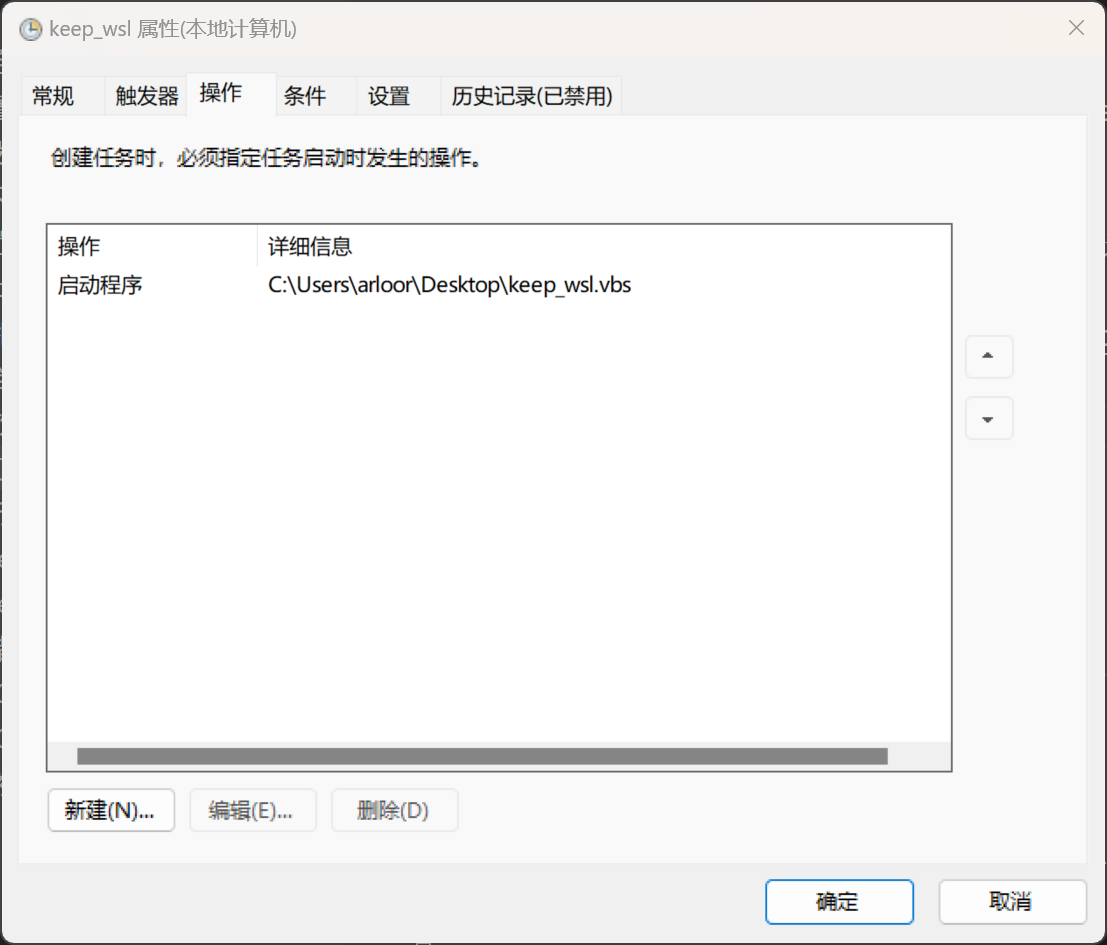
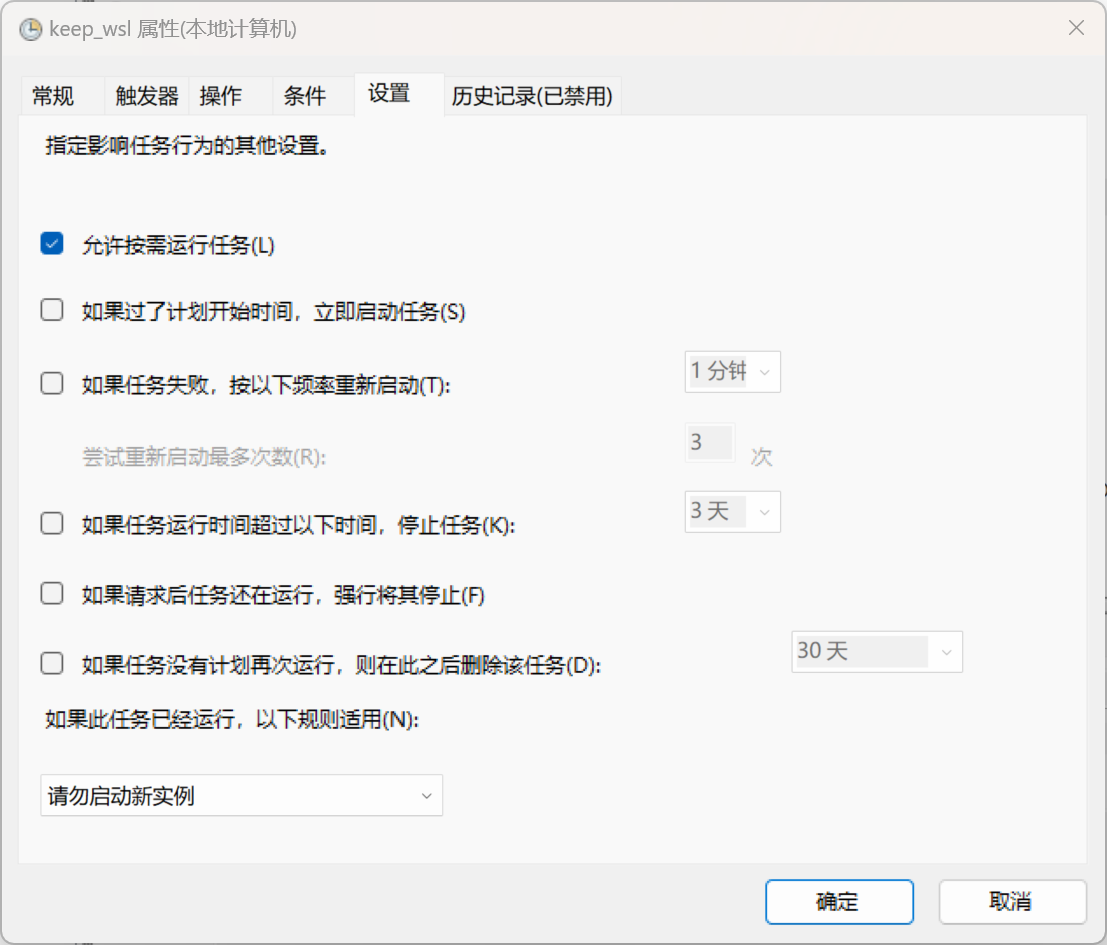
或者使用 windows 的任务计划程序设置为用户登录时自动运行,参考实现 WSL 2 开机免登录自动启动:
卸载发行版
wsl --terminate Debian # 停止
wsl --unregister Debian # 卸载
WSL2 debian12 安装 openssh-server
apt remove -y openssh-server
apt install -y openssh-server
mkdir -p /root/.ssh
echo ssh-rsa AAAAB3NzaC1yc2EAAAADAQABAAABAQDZQzKHfZLlFEdaRUjfSK4twhL0y7+v23Ko4EI1nl6E1/zYqloSZCH3WqQFLGA7gnFlqSAfEHgCdD/4Ubei5a49iG0KSPajS6uPkrB/eiirTaGbe8oRKv2ib4R7ndbwdlkcTBLYFxv8ScfFQv6zBVX3ywZtRCboTxDPSmmrNGb2nhPuFFwnbOX8McQO5N4IkeMVedUlC4w5//xxSU67i1i/7kZlpJxMTXywg8nLlTuysQrJHOSQvYHG9a6TbL/tOrh/zwVFbBS+kx7X1DIRoeC0jHlVJSSwSfw6ESrH9JW71cAvn6x6XjjpGdQZJZxpnR1NTiG4Q5Mog7lCNMJjPtwJ not@home >/root/.ssh/authorized_keys
sed -i 's/\(#\)\?PasswordAuthentication yes/PasswordAuthentication no/g' /etc/ssh/sshd_config
sed -i 's/\(#\)\?PubkeyAuthentication no/PubkeyAuthentication yes/g' /etc/ssh/sshd_config
sed -i 's/\(#\)\?Port .*/Port 222/g' /etc/ssh/sshd_config # 改成222端口
sed -i 's/\(#\)\?UseDNS.*/UseDNS no/g' /etc/ssh/sshd_config
systemctl restart sshd
systemctl enable ssh.service
放通 windows 防火墙:
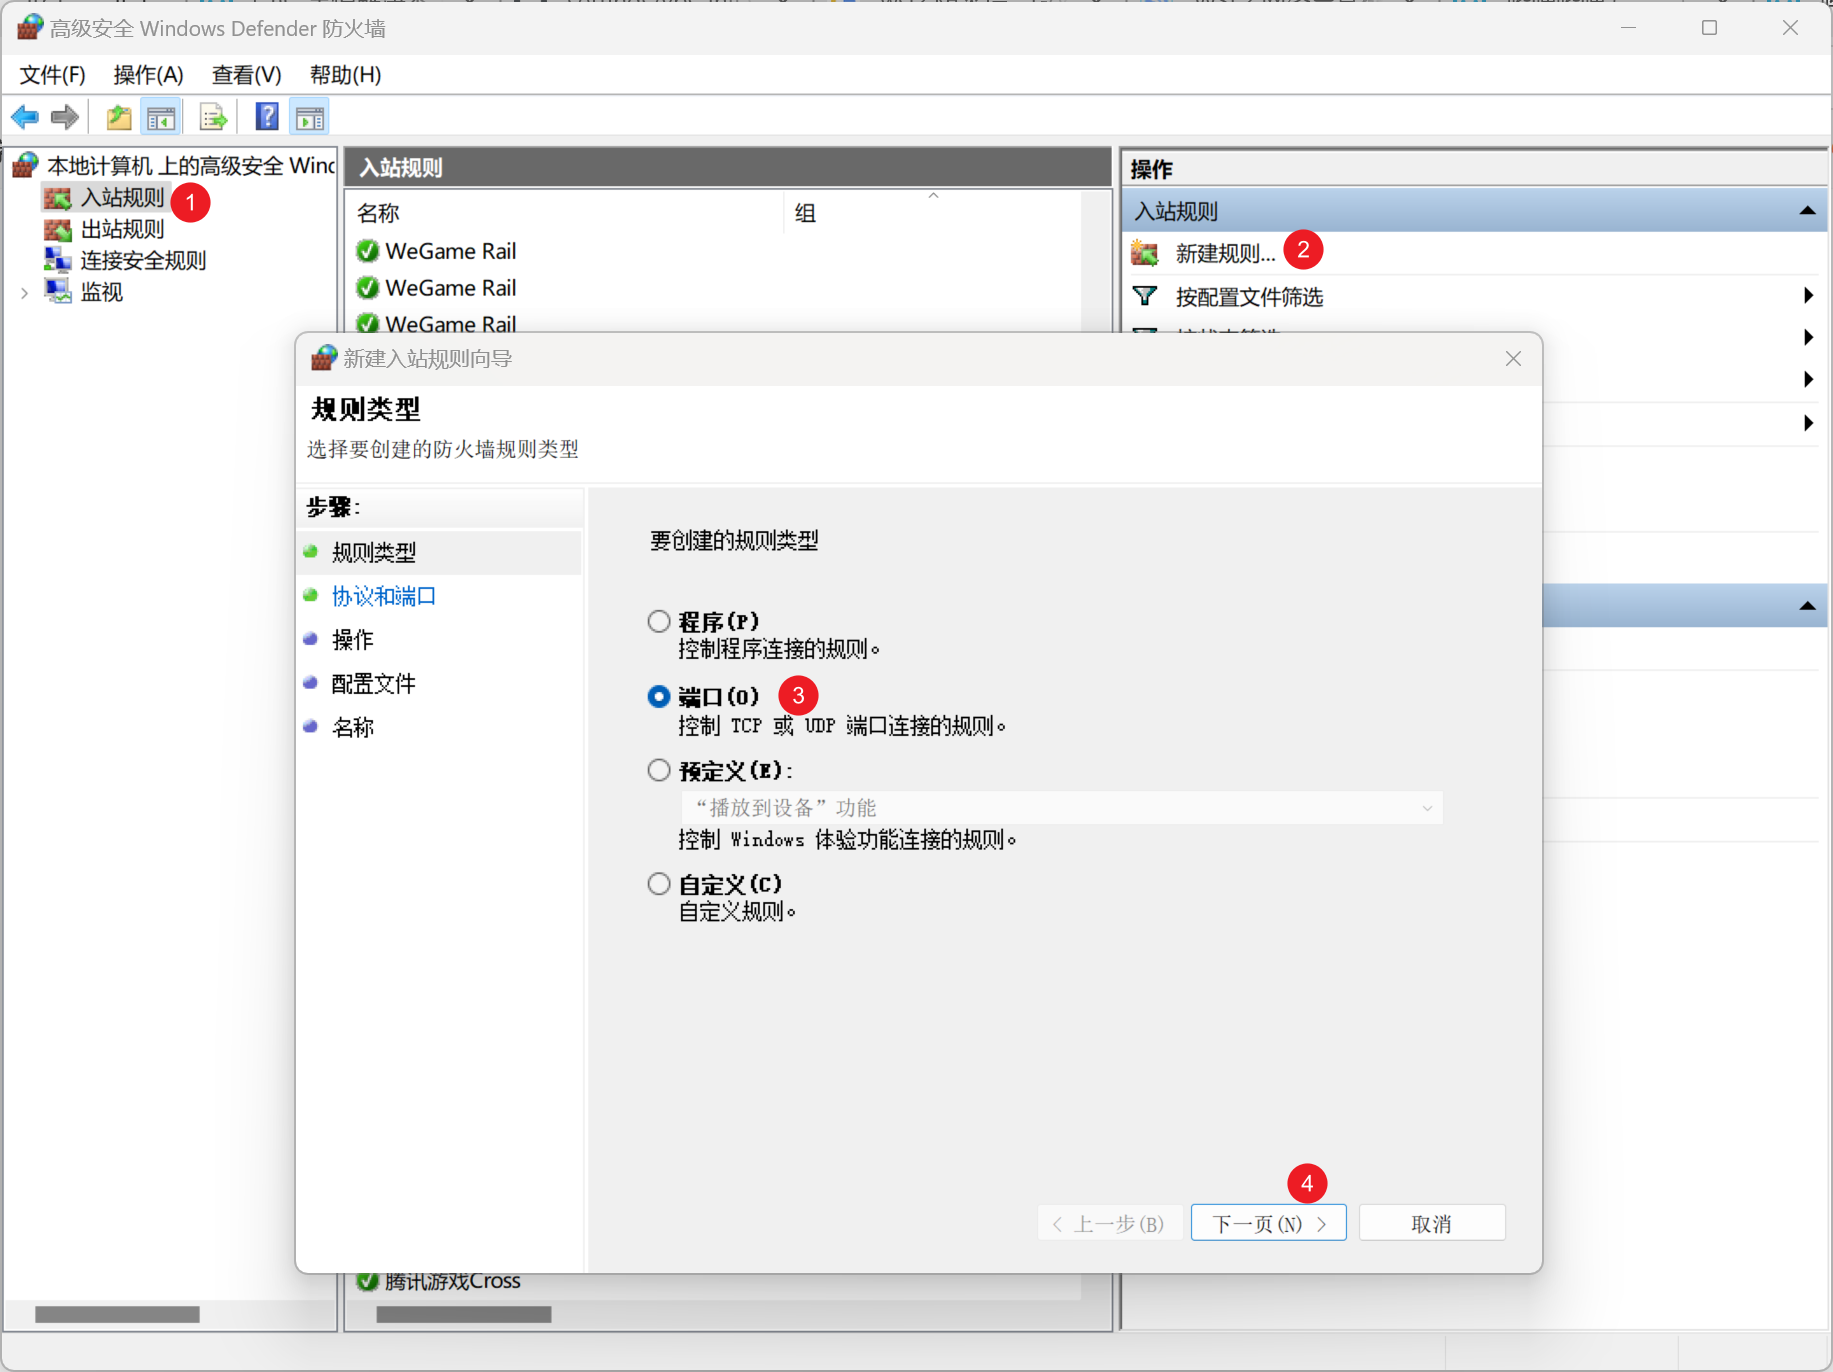
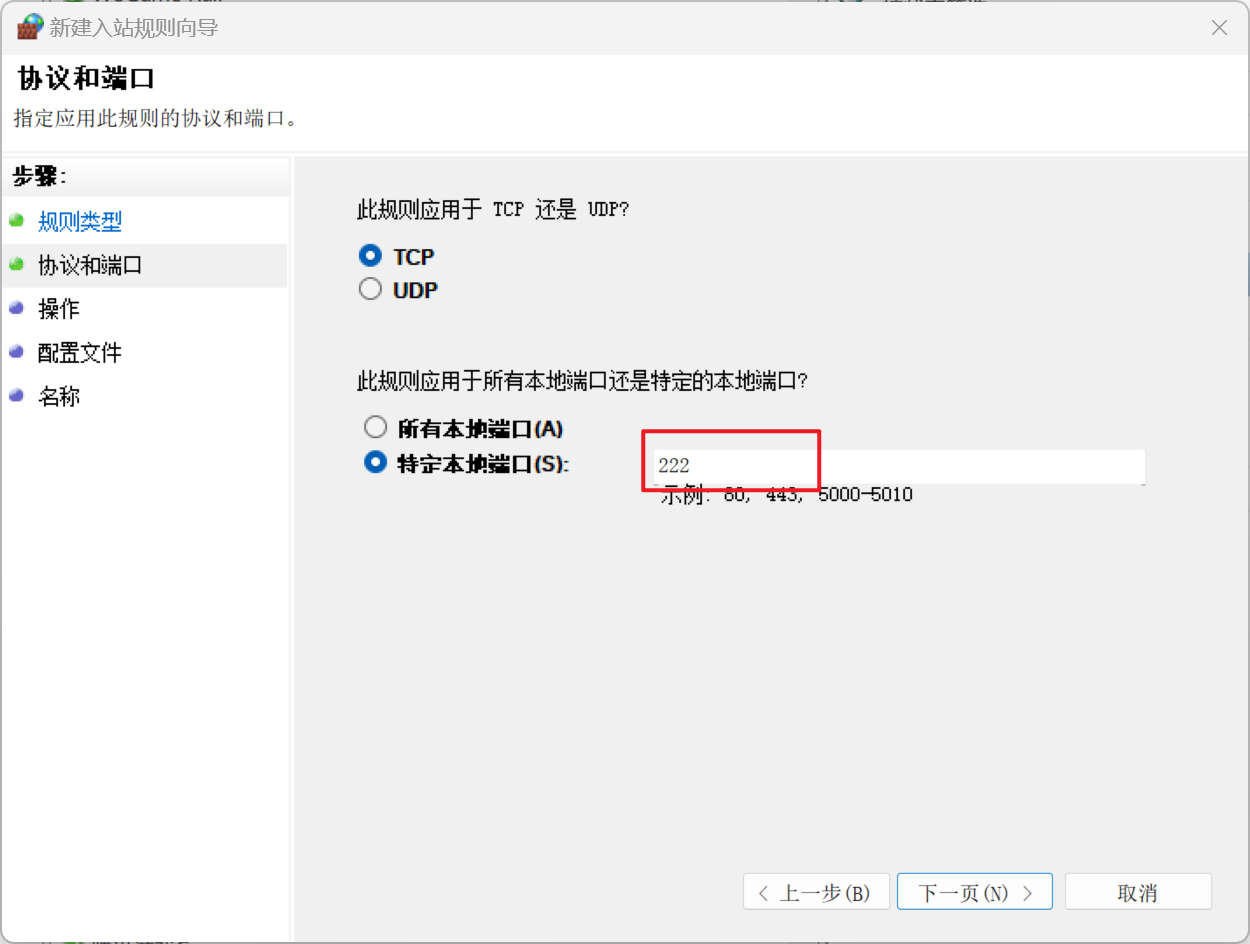
然后一路下一步即可。
或者直接在管理员权限的 powershell 执行:
$port=2222
New-NetFirewallRule -DisplayName "Allow Port $port" -Direction Inbound -Protocol TCP -LocalPort $port -Action Allow
之后就可以使用 vscode remote-ssh 到 WSL2 上来开发了。具体的 ssh config 如下:
Host wsl
  HostName 192.168.xx.xx
  Port 222
  User root
不过因为 wsl2 有 idle 自动关闭的特性,所以从外部 remote-ssh 进来时,需要从外部保活 WSL2。思路是 ssh 到 windows 上(参考widnows11 启用 openssh-server),然后执行一个前台命令一直运行,具体命令是:
ssh windows_user@windows -t wsl
将 vhdx 文件移动到 D 盘
(Get-ChildItem -Path HKCU:\Software\Microsoft\Windows\CurrentVersion\Lxss | Where-Object { $_.GetValue("DistributionName") -eq 'Debian' }).GetValue("BasePath") + "\ext4.vhdx"
wsl -l
wsl --export Debian d://Debian.tar  # 导出成tar文件
wsl --unregister Debian # 需要先注销原来的发行版
mkdir d:\wsl # 创建目录
wsl --import Debian d:\wsl D:\Debian.tar  --version 2# 导入到D盘
# 确认vhdx文件位置
(Get-ChildItem -Path HKCU:\Software\Microsoft\Windows\CurrentVersion\Lxss | Where-Object { $_.GetValue("DistributionName") -eq 'Debian' }).GetValue("BasePath") + "\ext4.vhdx"
安装 rhel10 作为 WSL
mkdir D:\redhat
wsl --import rhel D:\redhat C:\Users\arloor\Downloads\composer-api-8d21250f-6d7f-4483-8a1e-c79c51929d45-disk.tar.gz
wsl.exe --shutdown
wsl.exe --manage rhel --set-sparse true --allow-unsafe
常见报错解决
0x80070422 wslservice 服务未启动
无法启动服务,原因可能是已被禁用或与其相关联的设备没有启动。
Error code: Wsl/0x80070422
解决方案:
sc.exe config wslservice start= demand
0x8004032d 虚拟机平台功能未启用
WslRegisterDistribution failed with error: 0x8004032d
Error: 0x8004032d (null)
解决方案:在启用和关闭 windows 功能中打开“虚拟机平台”或使用下面的 cmd 命令并重启
dism.exe /online /enable-feature /featurename:VirtualMachinePlatform /all /norestart
端口被占用问题解决
# 查看当前动态端口范围
netsh int ipv4 show dynamicport tcp
# 查看被使用的端口
netsh int ipv4 show excludedportrange protocol=tcp

# 修改动态端口范围
netsh int ipv4 set dynamic tcp start=50000 num=15536
netsh int ipv6 set dynamic tcp start=50000 num=15536
# 重启网络
net stop winnat
net start winnat